Schnellstart mit BashSupport Pro
Vielen Dank, dass Sie BashSupport Pro verwenden!
Wir hoffen, dass diese Anleitung Ihnen hilft, schnell loszulegen. Bitte kontaktieren Sie uns, wenn Sie nicht weiterkommen oder nicht wissen, wie Sie unsere Software verwenden sollen.
Installieren einer JetBrains IDE
BashSupport Pro ist eine Erweiterung für JetBrains-IDEs. Sie müssen eine solche IDE installieren, um unsere Software nutzen zu können. Wenn Sie bereits IntelliJ IDEA oder eine der anderen IDEs verwenden, dann überspringen Sie einfach diesen Schritt.
- Wählen Sie eine IDE. Am einfachsten ist es, eine IDE über die JetBrains Produktauswahl auszuwählen.
- Klicken Sie auf die Schaltfläche “Herunterladen” neben der IDE Ihrer Wahl.

Verwenden der JetBrains Produktauswahl
- Installieren Sie die IDE auf Ihrem System. In dieser Anleitung werden wir IntelliJ IDEA Community verwenden. Eine alternative Möglichkeit zur Installation ist JetBrains Toolbox. Auf der Download-Seite finden Sie Links zu Installationsanweisungen.
- Starten Sie die IDE. Es wird nun ein Assistent zum Einrichten Ihrer IDE angezeigt.
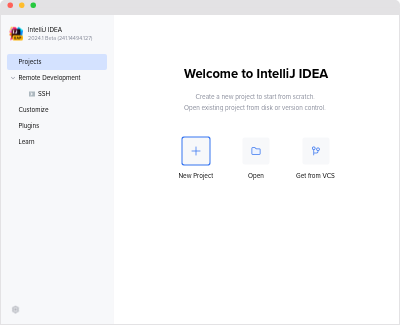
IntelliJ IDEAs Willkommen-Dialog - Klicken Sie auf Open und wählen Sie ein leeres Verzeichnis als Projekt. In unserem Beispiel wählen wir
/bashsupport-projectals Verzeichnispfad.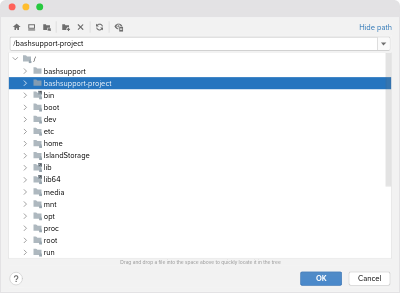
Wählen eines leeren Projektverzeichnisses - Nun wird ein neues Fenster Ihrer IDE geöffnet.

IntelliJ IDEA mit einem neuen Projekt - Schließen Sie den Dialog über die täglichen Tipps und andere sichtbare Benachrichtigungen. Wenn Ihre IDE eine neue Datei für das neue Projekt geöffnet hat, schließen Sie sie einfach.
Installieren und Konfigurieren von BashSupport Pro
Sie benötigen:
- eine JetBrains IDE, Version 2024.2 oder höher
- macOS, Linux oder Windows
Es gibt zwei Möglichkeiten, das BashSupport Pro Plugin zu installieren.
Automatische Installation
- Starten Sie Ihre JetBrains IDE
- Klicken Sie auf die Schaltfläche “Installieren” weiter unten. Ihre IDE wird Sie auffordern, “bashsupport.com” zu vertrauen. Wenn Sie dies akzeptieren, erscheint ein Dialog, in dem Sie die Installation unseres Plugins bestätigen können.
- Bitte starten Sie Ihre IDE neu, um das neue Plugin zu aktivieren.
Manuelle Installation
- Wählen Sie Preferences… → Plugins → Marketplace.
- Geben Sie “BashSupport Pro” in die Sucheingabe ein.
- Klicken Sie auf Install neben “BashSupport Pro”.
- Ihre IDE zeigt möglicherweise eine Meldung an, dass Sie Plugins von Drittanbietern vertrauen sollen. Sie müssen dies bestätigen, um fortzufahren.
- Die Schaltfläche Install ändert sich in Restart IDE
- Klicken Sie auf diese Schaltfläche, um die Installation von BashSupport Pro abzuschließen.

Aktivieren Ihrer Lizenz
BashSupport Pro benötigt eine Lizenz. Es gibt einen kostenlosen 30-tägigen Testzeitraum, wenn Sie es zum ersten Mal verwenden.
- Nach dem Neustart zeigt Ihre IDE einen Dialog zur Eingabe der Lizenzinformationen an.
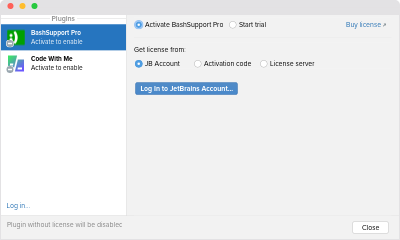
Dialog um Ihre Lizenz von BashSupport Pro zu aktivieren - Wählen Sie die Lizenz, die Sie aktivieren möchten:
- Activate BashSupport Pro wenn Sie bereits eine Lizenz erworben haben
- Start trial, um Ihre kostenlose 30-tägige Testversion zu nutzen. Dies ist nur möglich, wenn Sie noch nie eine Testversion der aktuellen Hauptversion verwendet haben.
- Klicken Sie auf Log In to JetBrains Account…, um die mit Ihrem JetBrains-Konto verbundene Lizenz abzurufen.
- Klicken Sie auf Activate, um die Aktivierung zu beenden und den Dialog zu schließen.
Herzlichen Glückwunsch, Sie haben Ihr Exemplar von BashSupport Pro erfolgreich registriert!
Einrichten von BashSupport Pro
Jetzt sollten Sie das Hauptfenster und eine Benachrichtigung sehen, die Ihnen bei der Einrichtung von BashSupport Pro hilft.
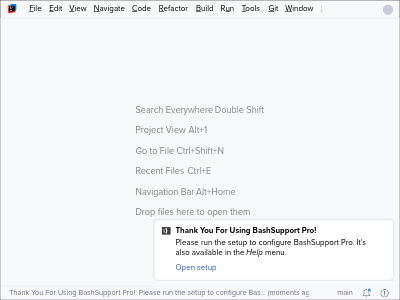
Benachrichtigung um BashSupport Pro zu konfigurieren Klicken Sie auf Open Setup, um den Einrichtungsassistenten zu starten. Wenn Sie diese Benachrichtigung nicht sehen, verwenden Sie bitte Help → BashSupport Pro Setup.
Auf der ersten Seite finden Sie wichtige Links und Hinweise für den Einstieg. Klicken Sie auf Next.

Einrichtungsassistent von BashSupport Pro Konfigurieren Sie die Plugins Ihrer IDE.
Die meisten JetBrains IDEs bündeln das JetBrains Shell Plugin. Da sich das Shell-Plugin für dieselben Dateierweiterungen registriert, ist es nicht empfehlenswert, beide Plugins gleichzeitig zu verwenden.
Klicken Sie auf Next, um das JetBrains Shell-Plugin zu deaktivieren.

Einrichtungsassistent von BashSupport Pro Jetzt werden einige optionale Schritte gezeigt. Wenn Sie gelegentlich über das Plugin informiert werden möchten, melden Sie sich bitte für unseren Newsletter an.
Klicken Sie auf Next, um die Informationen zu übernehmen.

Optionaler Einrichtungsschritt von BashSupport Pro Falls erforderlich, werden Sie im letzten Schritt aufgefordert, Ihre IDE neu zu starten. Bitte klicken Sie auf Restart, um alle Änderungen zu übernehmen. Andernfalls klicken Sie auf Finish, um das Dialogfeld zu schließen.

Letzter Einrichtungsschritt von BashSupport Pro
Konfigurieren Ihrer Shell-Interpreter
BashSupport Pro erkennt die installierten Shellskript-Interpreter auf Ihrem System. Bitte stellen Sie sicher, dass Sie mindestens einen unterstützten Bash-Interpreter installiert haben und dass dieser korrekt erkannt wird.
- Öffnen Sie die Einstellungen unter Preferences… → Languages & Frameworks → BashSupport Pro → Shell Interpreters

Einstellungen der Interpreter - Überprüfen Sie, ob die Tabelle mindestens eine Zeile des Typs Bash (.bash) enthält.
- Wenn Sie keinen Bash-Interpreter sehen, vergewissern Sie sich bitte, dass Bash installiert ist und aktualisieren Sie die Tabelle mit der Aktion “Rescan”.
- Schließen Sie diesen Dialog.
Ihr erstes Skript erstellen
Jetzt können wir unsere erste Shellskript-Datei erstellen!
- Öffnen Sie die Projektansicht, das ist das Werkzeugfenster auf der linken Seite mit dem Titel Project.
- Wählen Sie das oberste Verzeichnis und öffnen Sie das Kontextmenü, indem Sie mit der rechten Maustaste auf den Eintrag klicken.
- Wählen Sie New → Shell Script
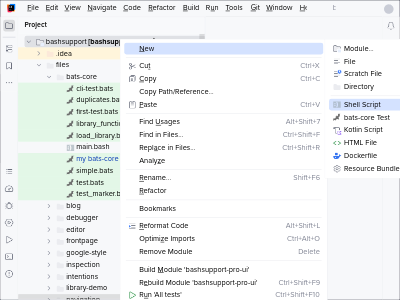
Erstellen des ersten Shellskripts - Es erscheint ein Popup zur Erstellung der Shellskriptdatei.

Popup um die Art ihres neuen Skriptes zu wählen - Geben Sie quickstart.bash als Dateinamen ein und drücken Sie Enter , um die neue Datei zu erstellen.
- Jetzt wird die Datei angelegt und der Editor für Sie geöffnet.
Es erscheint ein Popup, in dem Sie die Shebang-Zeile auswählen können.
Drücken Sie einfach die
Eingabetaste
, um den Standardwert zu übernehmen.

Editor, der die neue Datei zeigt
Ihr Skript bearbeiten
Unsere Aufgabe ist es, eine Funktion zu erstellen, die eine Zahl n entgegennimmt und die Summe 1 + 2 + ... + n auf STDOUT ausgibt.
Zum Beispiel ist für n=5 die Summe von 1+2+3+4+5 die Zahl 15.
- Geben Sie
func
ein, um die Vorlage für eine neue Funktion zu erhalten.
Drücken Sie gegebenenfalls auf
Alt →
Eingabetaste
, um das Menü zur Code-Vervollständigung anzuzeigen.

Vorlage zum Erstellen einer neuen Funktion - Geben Sie den Namen der neuen Funktion ein:
print_sum
.
Drücken Sie Eingabetaste , um den Textcursor in den Funktionsrumpf zu bewegen. - Drücken Sie erneut
Eingabetaste
, um den vorgeschlagenen Text der Funktion zu übernehmen.

Neuerstellte Shellskript-Funktion - Jetzt sind wir bereit, die Funktion zu implementieren!
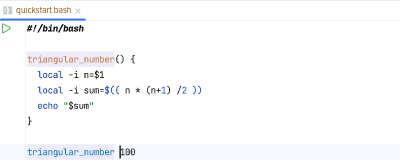
Wir sind faul und verwenden die Formel für Dreieckszahlen:sum = n * (n + 1) / 2. Wir verwenden einen arithmetischen Ausdruck$(( )), um das Ergebnis zu berechnen. - Unsere Funktion sieht nun wie folgt aus:

Funktion zur Berechnung der Summe 1+2+...+n
Codevervollständigung
Unsere Funktion wird noch nicht verwendet. Wir verwenden die Codevervollständigung, um einen Aufruf der Funktion einzufügen.
- Fügen Sie am Ende der Datei einige Leerzeilen ein.
- Rufen Sie die Codevervollständigung mit
Strg →
Leertaste
auf, um den Namen unserer neuen Funktion anzuzeigen.

Codevervollständigung eines Funktionsnamens - Drücken Sie Eingabetaste , um den Funktionsaufruf einzufügen und geben Sie eine Zahl als Argument ein.
Umbenennen von Elementen
BashSupport Pro hilft Ihnen bei der Umbenennung von Variablen, Funktionen und mehr.
Umbenennen einer Funktion
Benennen wir die Funktion print_sum in triangular_number um.
Setzen Sie dazu den Textcursor auf print_sum.
Dabei spielt es keine Rolle, ob es sich hierbei um den Namen der Definition oder den Namen des Aufrufs handelt.
Wählen Sie Refactor → Rename…, um die Umbenennung zu starten.

Geben Sie den neuen Namen ein und bestätigen Sie Ihre Wahl mit Eingabetaste .
Umbenennen einer Variable
Variablen werden auf dieselbe Weise umbenannt.
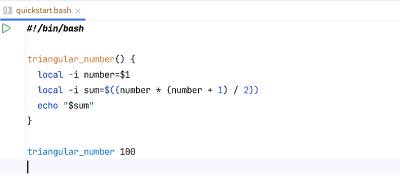
Wir möchten die lokale Variable n in number umbenennen.
Setzen Sie den Textcursor auf n, rufen Sie Refactor → Rename… auf und geben Sie den neuen Namen der Variablen ein.

Wie Sie sehen können, wurden die Definition und alle Verweise aktualisiert.
Formatierung
Die Abstände und Einrückungen in unserer Datei müssen bereinigt werden. Formatieren wir sie neu!
Rufen Sie Code → Reformat File auf, um zu auszuwählen, wie die Datei neu formatiert werden soll. Wählen Sie Whole file, denn das wird am besten unterstützt.

Bestätigen Sie Ihre Wahl mit Eingabetaste , um die Datei neu zu formatieren. Sie sieht nun wie folgt aus:
Navigieren in Ihrem Skript
Zur Definition springen
Navigate → Declaration or Usages ermöglicht es Ihnen, zwischen Verweisen auf Funktionen oder Variablen und deren Definitionen zu navigieren.
Üben wir dies mit der Variablen number.
- Setzen Sie den Textcursor auf eine Referenz der Variable
number.
Navigation von einer Variablenreferenz zur Definition - Führen Sie Navigate → Declaration or Usages aus oder verwenden Sie das entsprechende Tastaturkürzel.
- Der Textcursor befindet sich nun an der Stelle, an der die Variable definiert ist.

Nach der Navigation zur Variablendefinition
Ausführen des Skripts
Es ist an der Zeit, unser kleines Skript auszuführen!
Es gibt zwei Möglichkeiten, dies zu tun:
- Run → Run ‘quickstart.bash’

Ausführen des Skriptes mittels des Hauptmenüs - Der grüne Pfeil auf der linken Seite der ersten Zeile des Editors.

Ausführen eines Skriptes mittels Zeilenmarker
Führen Sie das Skript aus, indem Sie auf eines der beiden Elemente klicken. Das Werkzeugfenster Run wird nun geöffnet und zeigt die Ausgabe des Skripts an.

Debuggen Ihres Skripts
Haltepunkte setzen
Ein Haltepunkt definiert die Stelle, an der die Ausführung angehalten werden soll, damit Sie es untersuchen können. Sie können einen Haltepunkt hinzufügen, indem Sie in den leeren Bereich links neben einer Zeile klicken. Ein roter Punkt signalisiert, dass in einer Zeile ein Haltepunkt gesetzt ist.

Starten des Debuggers
Der Debugger wird auf fast dieselbe Weise gestartet, verwenden Sie stattdessen einfach Debug ‘quickstart.bash’.

Wenn Sie den Debugger starten, wird das Werkzeugfenster Debug angezeigt.

Im Werkzeugfenster sehen Sie die verfügbaren Variablen, deren aktuelle Werte und mehr. Weitere Informationen über den Debugger finden Sie in unserer Dokumentation.
Herzlichen Glückwunsch!
Danke, dass Sie bis zum Ende durchgehalten haben!
Es gibt noch viel mehr, was BashSupport Pro leisten kann:
- Finden Sie Probleme in Ihren Skripten: ShellCheck und unsere eigenen Inspektionen
- Erstellen, Bearbeiten und Ausführen von bats-core Tests
- Weitere leistungsfähige Navigationsfunktionen
- Weitere Refactorings
- Unterstützung für die Z Shell
- Lesen Sie unsere vollständige Dokumentation, um mehr über alle verfügbaren Funktionen zu erfahren.
Bitte kontaktieren Sie uns, wenn Sie Fragen oder anderes Feedback zu BashSupport Pro haben.